


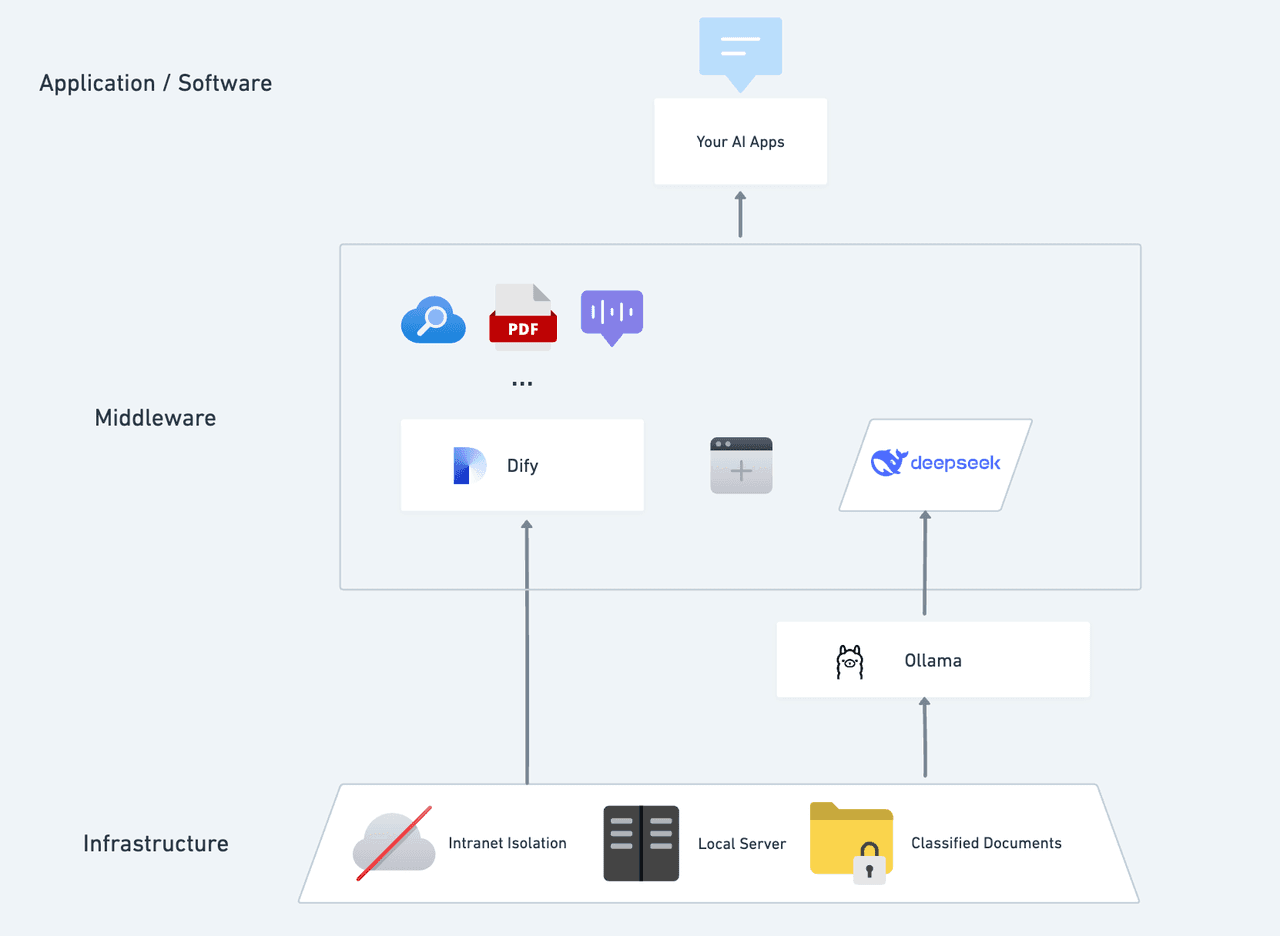
DeepSeek is a powerful open-source large language model with advanced features, including a unique "Reflective Chain" mechanism that enhances interaction quality. By deploying it privately, you gain full control over your data and customize your AI experience.
Dify, an open-source AI platform, enables seamless private deployment and integrates tools like web search and document analysis. With support for over 1,000 models, Dify simplifies custom AI development and ensures complete data privacy.
Together, Dify and DeepSeek offer a robust, fully private AI assistant that runs securely on your hardware. 🚀
Why Go Private with Dify x DeepSeek?
- Access to 1000+ AI Models: Dify is a model-agnostic platform, meaning you can tap into the reasoning capabilities of various LLMs.
- Pro tip: Leverage multiple third-party MaaS platforms supported by Dify to access the DeepSeek R1 model reliably—see the detailed setup guide below.
- Top-Notch Performance: Enjoy a commercial-grade AI experience that effortlessly handles complex interactions.
- Isolated Environment: Runs completely offline, eliminating any risk of data leaks.
- Full Data Control: You control your data, ensuring compliance with industry standards and maximum security.
Prerequisites
Hardware Requirements
- CPU: ≥ 2 Cores
- GPU/RAM: ≥ 16 GiB (Recommended)
Software Requirements
- Docker
- Docker Compose
- Ollama
- Dify Community Edition
Deployment Guide
1. Install Ollama
Think of Ollama as an app store for AI models. This open-source, cross-platform LLM management client (compatible with macOS, Windows, and Linux) makes it a breeze to deploy large language models like DeepSeek, Llama, and Mistral.
With a single command, you can install and run LLMs, and all usage data stays on your local machine for full privacy and compliance.
Head over to the Ollama official website and follow the instructions to download and install the client. Once installed, verify it by running:
~ ollama -vollama version is 0.5.5Based on your environment configuration, choose the appropriate DeepSeek model size for deployment. For initial installation, it is recommended to deploy the 7B model.
Note: The suffix B indicates the number of training parameters. In general, more parameters mean better performance but also higher memory requirements.
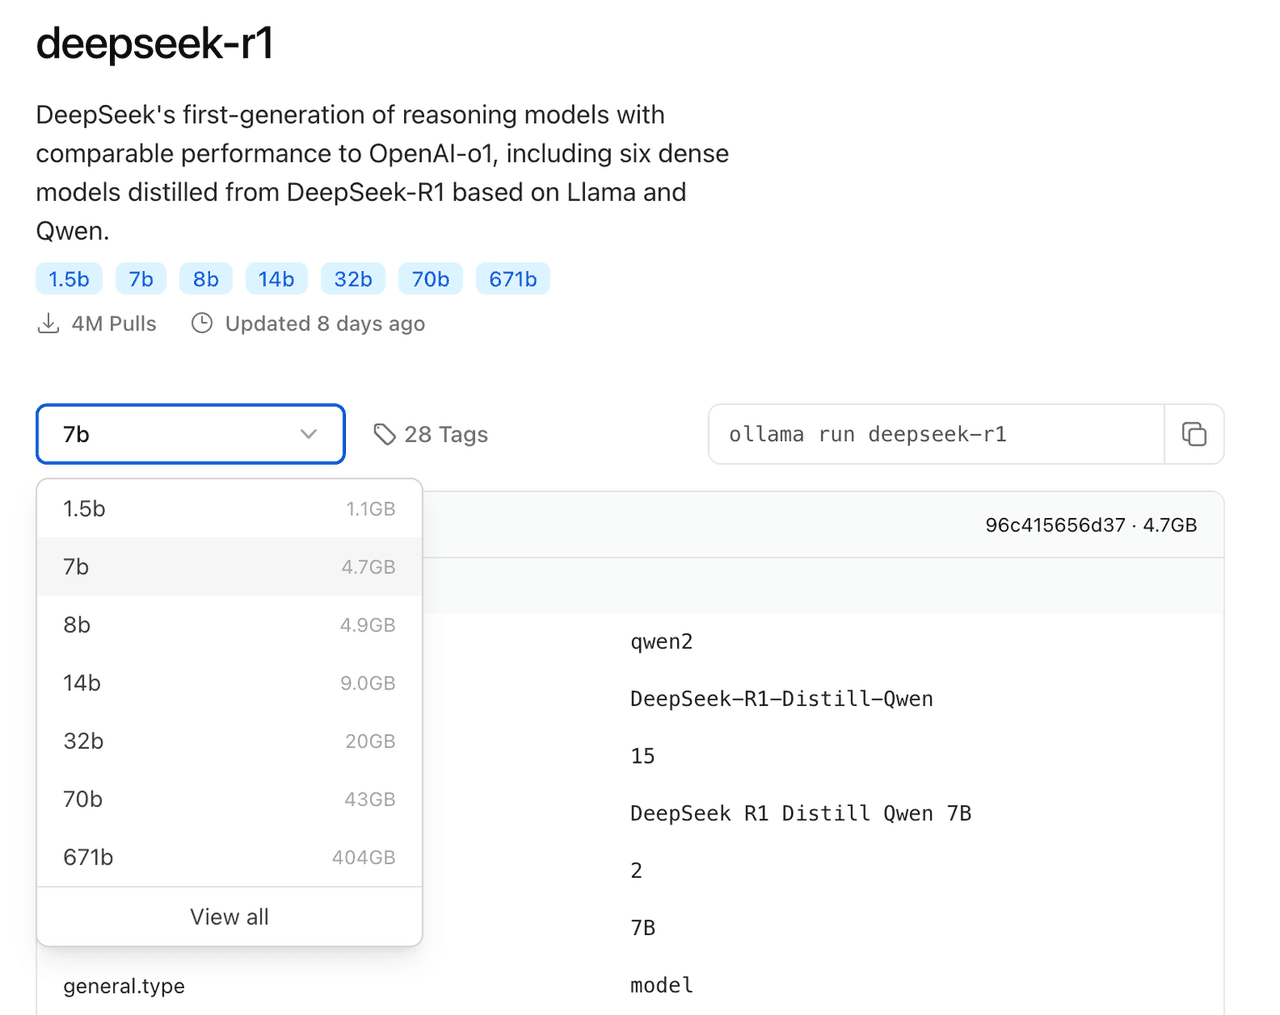
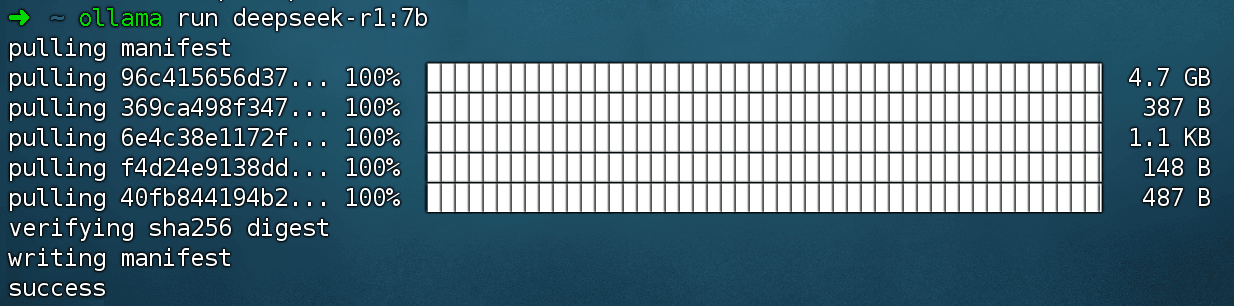
Run the command ollama run deepseek-r1:7b to install the DeepSeek R1 model.
2. Install Dify Community Edition
Just as a well-equipped kitchen is essential for a chef, Dify provides all the tools needed to build AI applications. This popular open-source project on GitHub comes with an all-in-one toolchain. Combined with DeepSeek’s capabilities, you can quickly build a user-friendly AI app without deep coding expertise.
Clone the Dify repository and install it by running:
git clone https://github.com/langgenius/dify.gitcd dify/dockercp .env.example .envdocker compose up -d # For Docker Compose V1, use: docker-compose up -dYour terminal should display the status of all containers and their port mappings. If you encounter any issues, double-check that Docker and Docker Compose are properly installed.
For more details, take refer to Deploying Dify Community Edition.
By default, Dify Community Edition uses port 80. You can access your private Dify platform via http://your_server_ip. To change the access port, refer to: How to Change the Web Access Port
3. Integrate DeepSeek with Dify
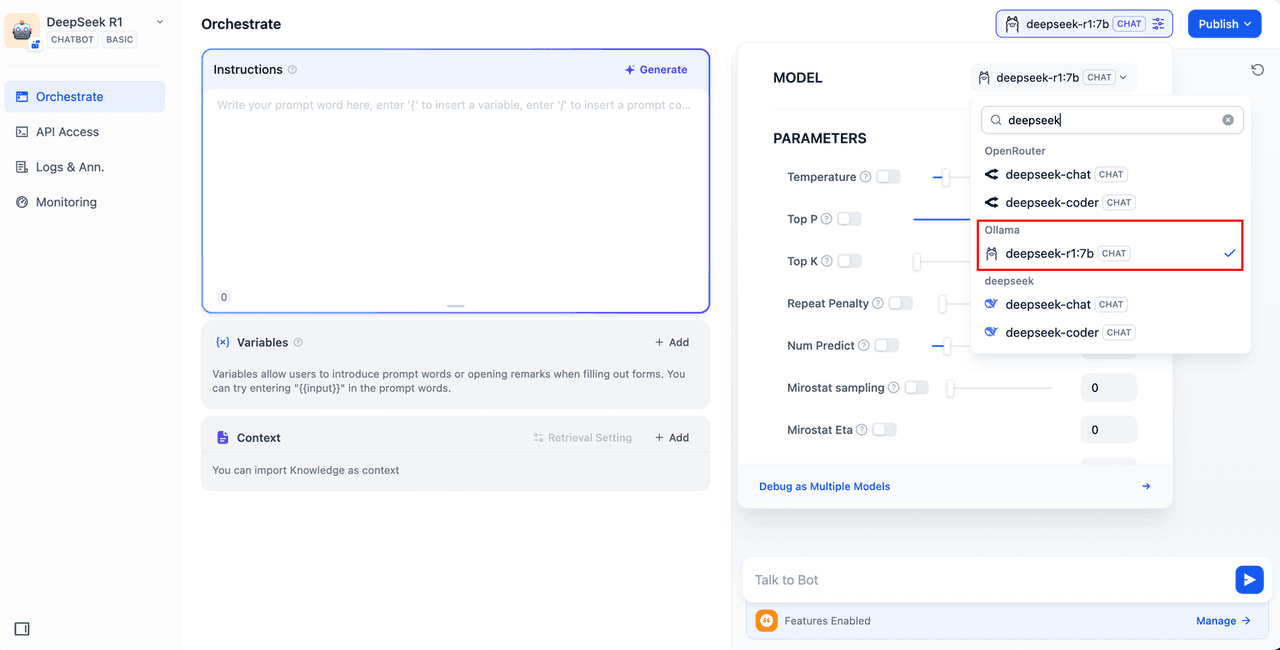
On the Dify platform, click the Profile → Settings → Model Providers in the top-right corner, select Ollama , and click “Add Model.”
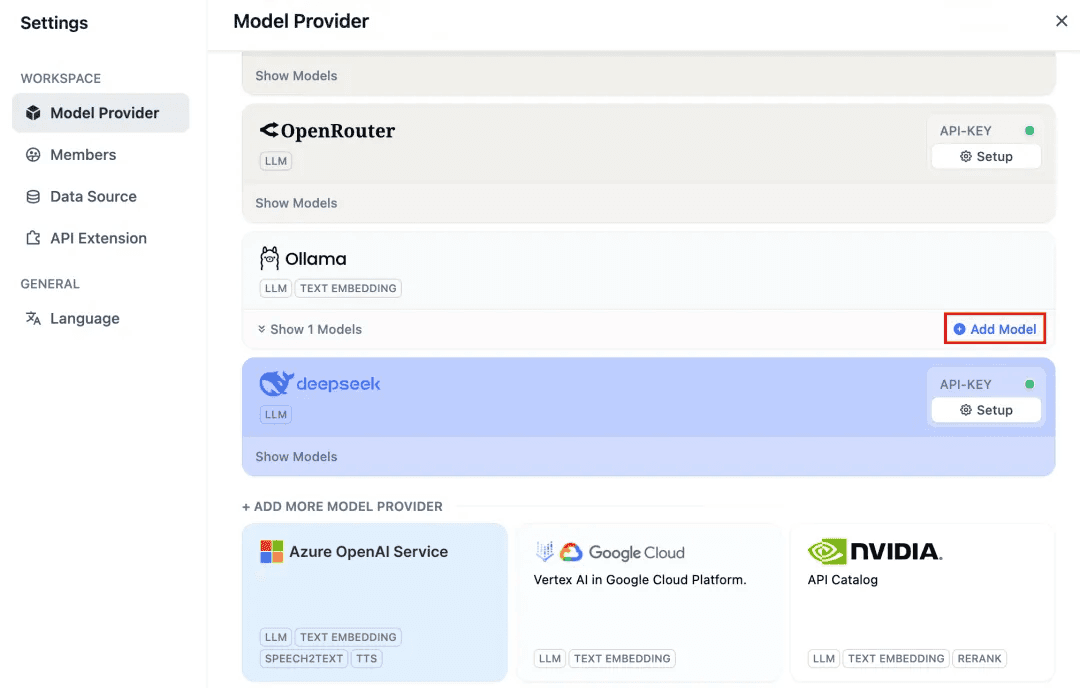
Fill in the details as follows:
- Model Name: Enter the specific model version you deployed. For example, if you deployed the deepseek-r1 7b model as described above, enter
deepseek-r1:7b. - Base URL: Enter the running address of your Ollama client, typically
http://your_server_ip:11434. If you encounter connection issues, please see the Common Issues section. - Leave the other options at their default values. According to the DeepSeek Model Documentation, the maximum token length is set to 32,768 Tokens.
Getting Started with Building AI Applications
Now that your private AI assistant is up and running, here are a few applications you can build:
- Simple conversational apps
- Simple conversational apps with file analysis capabilities
- Orchestrated apps with web search functionality
DeepSeek AI Chatbot (Simple Application)
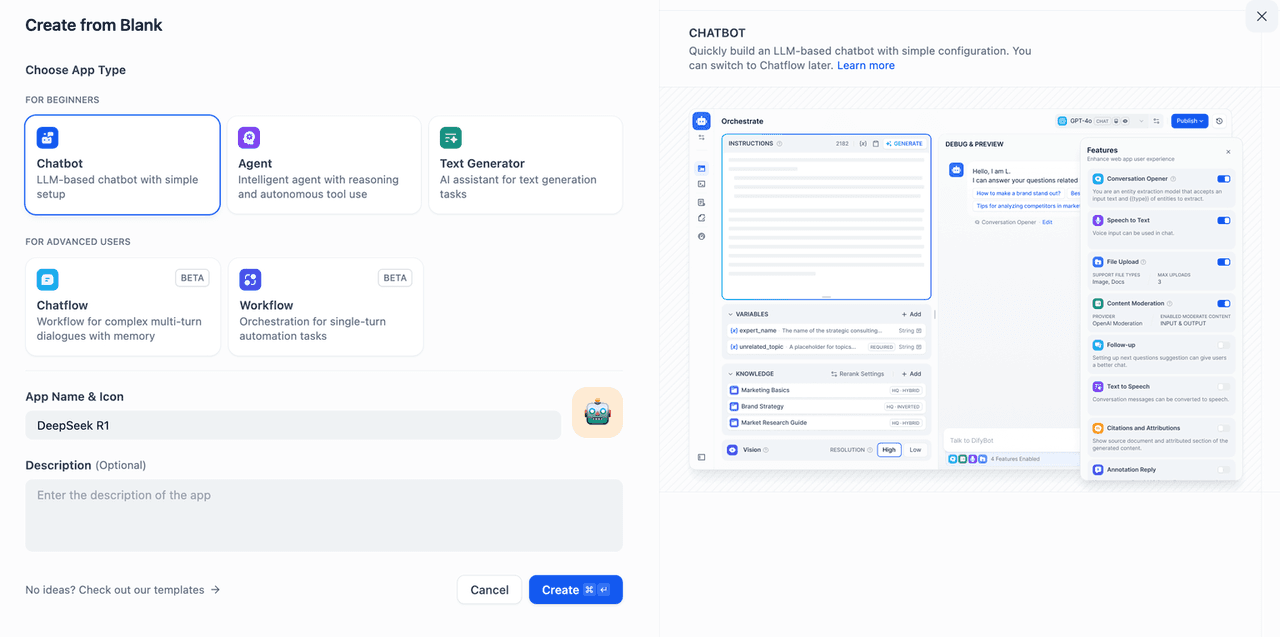
- On the Dify homepage, click Create Blank App on the left sidebar, select the Chatbot type, and give your app a name.
- Choose the deepseek-r1:7b model from the Ollama framework in the top-right application type selector.
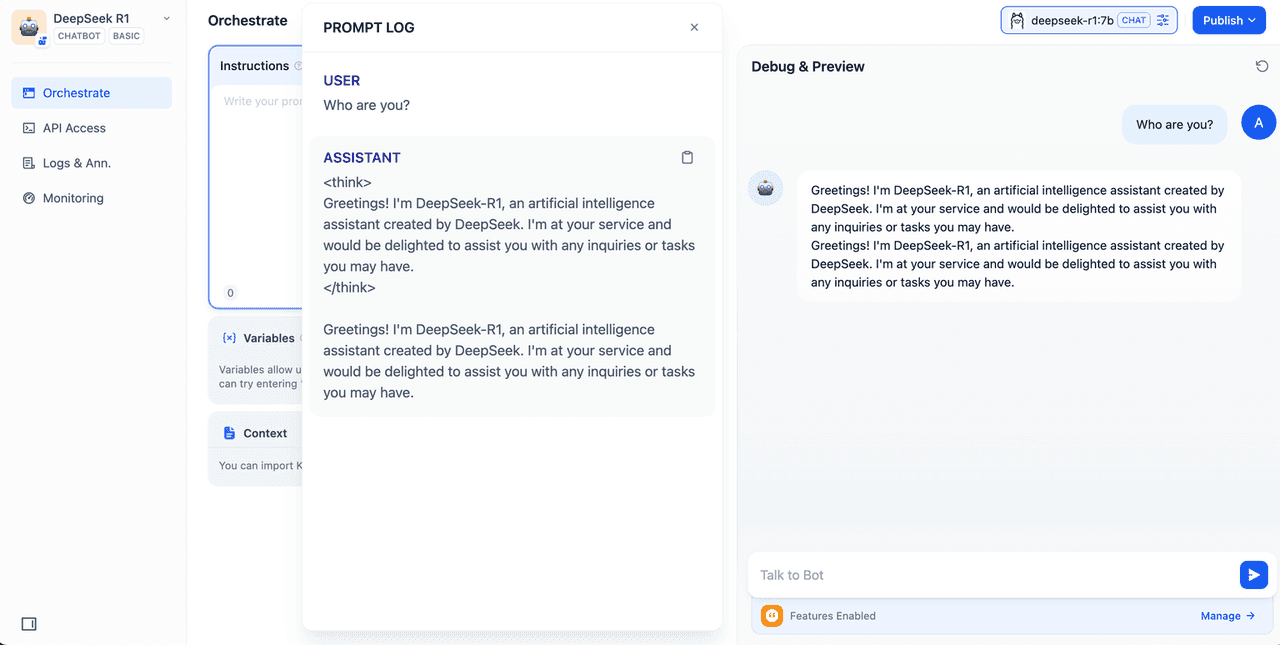
- Type a message in the chat preview window to verify the AI is responding correctly. Once you see a response, your app is ready.
- Click the Publish button at the top right of the app to get the app link, which you can share or embed on other websites.
DeepSeek AI Chatbot + Knowledge Base
One major challenge for large language models (LLMs) is that their training data is not updated in real time and might be insufficient, leading to "hallucinated" responses.
A common limitation of LLMs is that their training data isn’t updated in real time, which can sometimes lead to “hallucinated” responses.
Retrieval-Augmented Generation (RAG) addresses this by retrieving relevant information to provide context for the model’s responses, improving accuracy and reliability.
Here’s how to integrate a knowledge base:
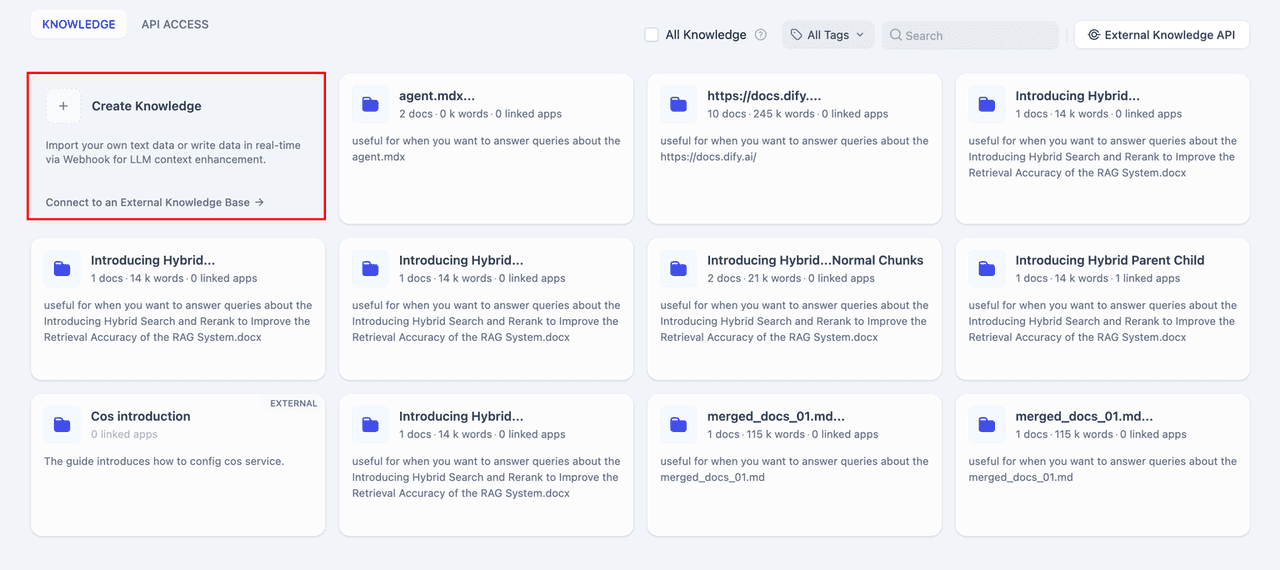
1. Create a Knowledge Base
Upload internal documents or professional materials for AI analysis. For better context preservation, use the Parent-Child Chunking mode to maintain the document’s structure. For more details, refer to Create a Knowledge Base
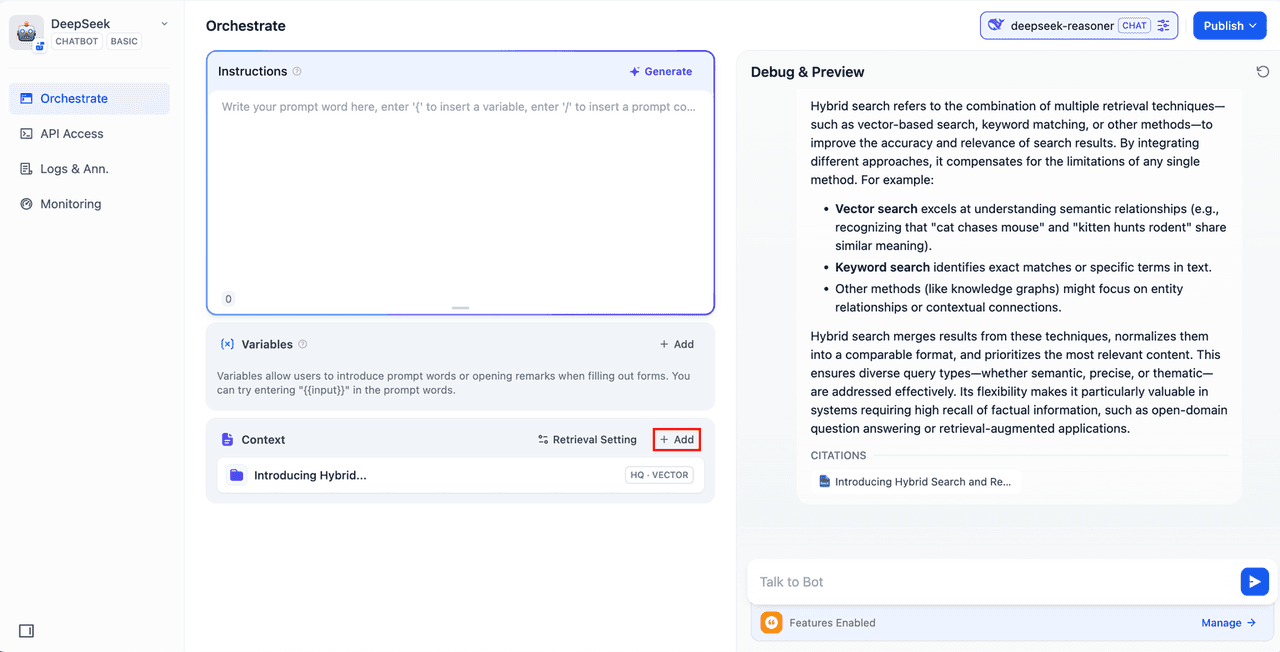
2. Integrate the Knowledge Base into the AI App
Add the knowledge base to the "Context" section of your AI app, then enter your query in the chat window. The LLM will first retrieve context related to the question from the knowledge base, summarize it, and generate a higher-quality response.
DeepSeek AI Chatflow / Workflow (Web Search)
For more complex solutions, you can create chatflows or workflows that integrate features like web search, file recognition, and even voice recognition. For brevity, the following section explains how to enable web search functionality for DeepSeek.
If you want to try the app directly, download the DSL file and import it into Dify:
Follow these steps:
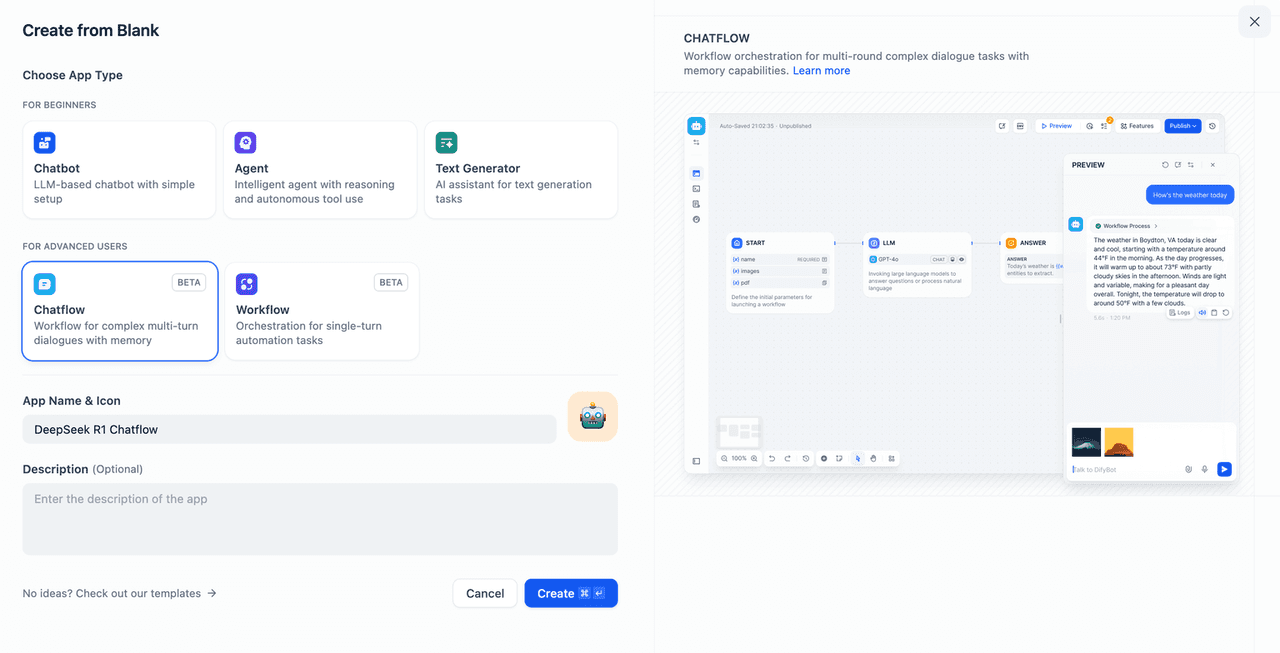
1. On the Dify homepage, click Create Blank App in the left sidebar, choose Chatflow or Workflow, and name your app.
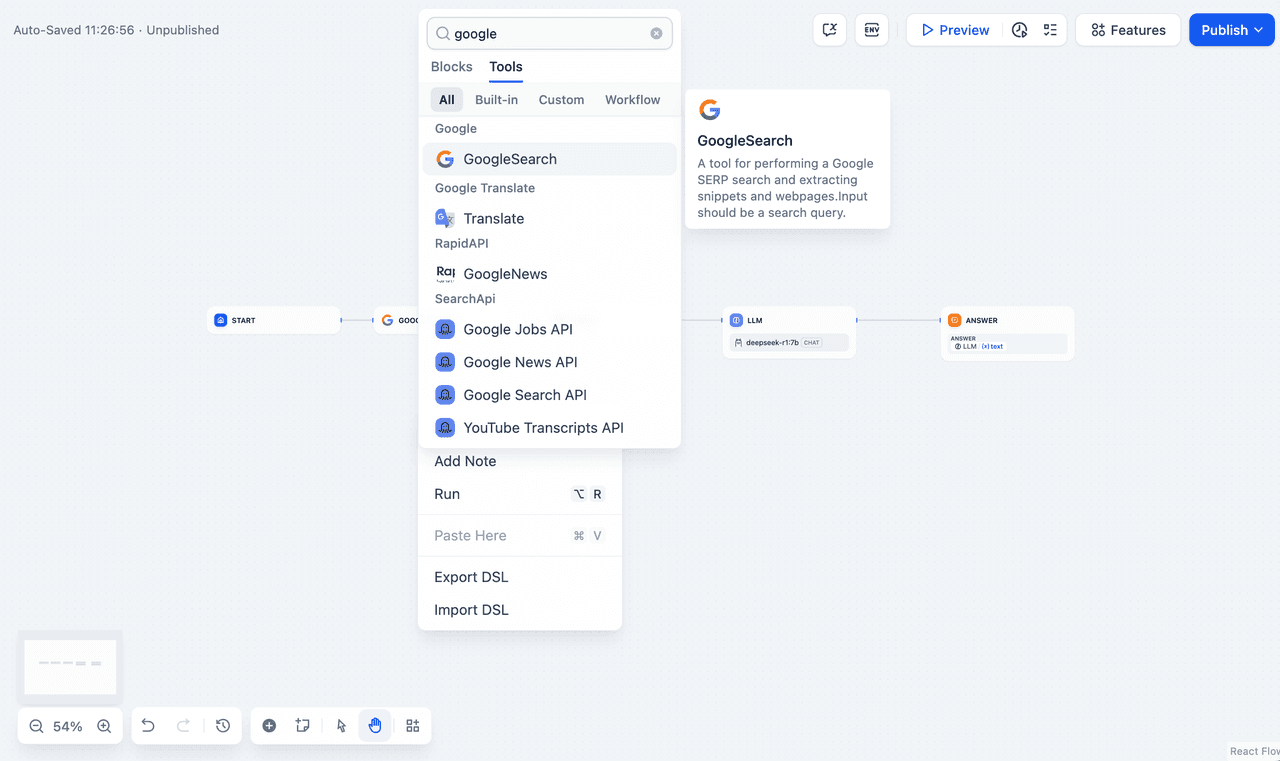
2. Add a Web Search node and enter your API Key to activate its functionality. In the Query field, use {{#sys.query#}} variable provided by the initial node. Obtain an API key at SerpApi.
3. Add a Code Execution node. Since the search tool outputs a JSON string, you need to add a Code Execution node to extract the necessary information. Set the input variable to the JSON output from the search tool, and insert the following code in the node:
def main(json: list) -> dict: # Extract the organic_results content organic_results = json[0].get("organic_results", []) # Concatenate all titles and links into a single string result_string = "" for item in organic_results: result_string += f"Title: {item['title']}\nLink: {item['link']}\nSnippet: {item['snippet']}\n\n" # Return the concatenated string as result return { "result": result_string, }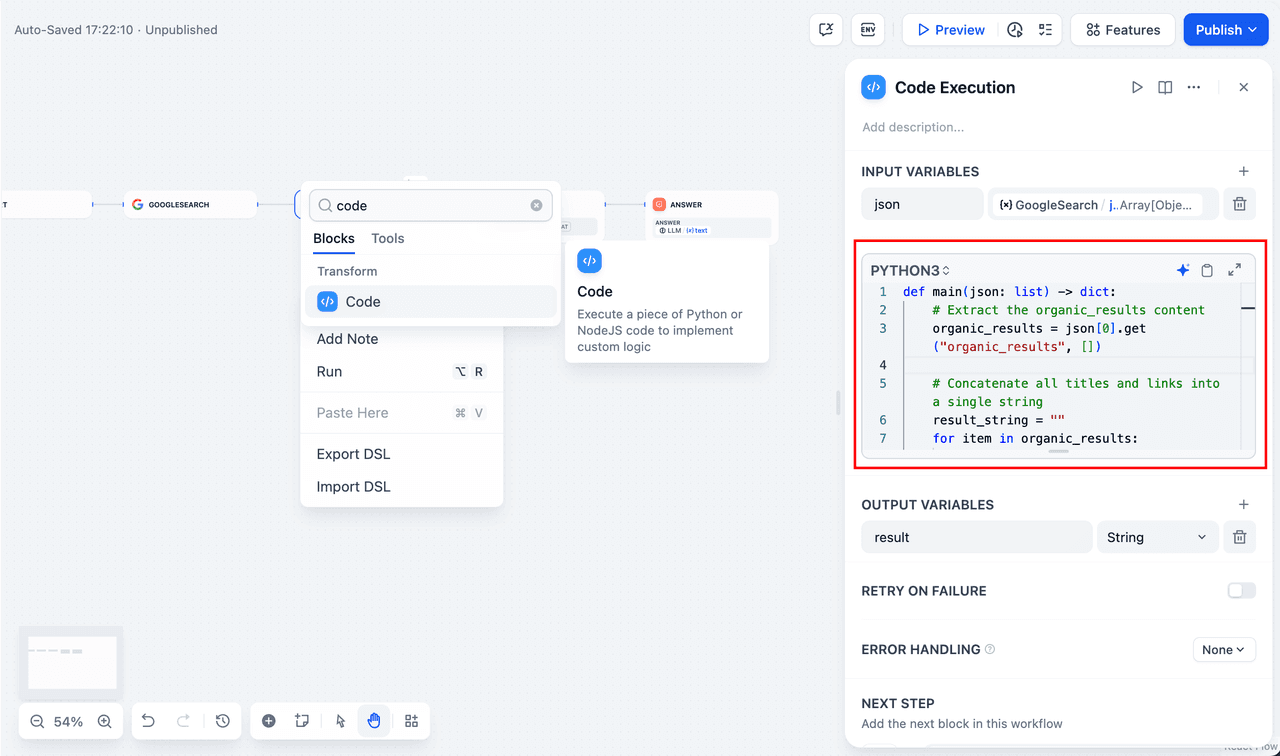
4. Add an LLM node, select the deepseek-r1:7b model from the Ollama framework, and insert the {{#sys.query#}} variable into the system prompt to handle the user’s input from the initial node. If you encounter API errors, you can use load-balancing or error-handling nodes for flexibility.
- Load Balancing: Distributes API requests across multiple endpoints. For details, see: Load Balancing
- Error Handling: Prevents workflow interruptions by catching errors. See: Error Handling
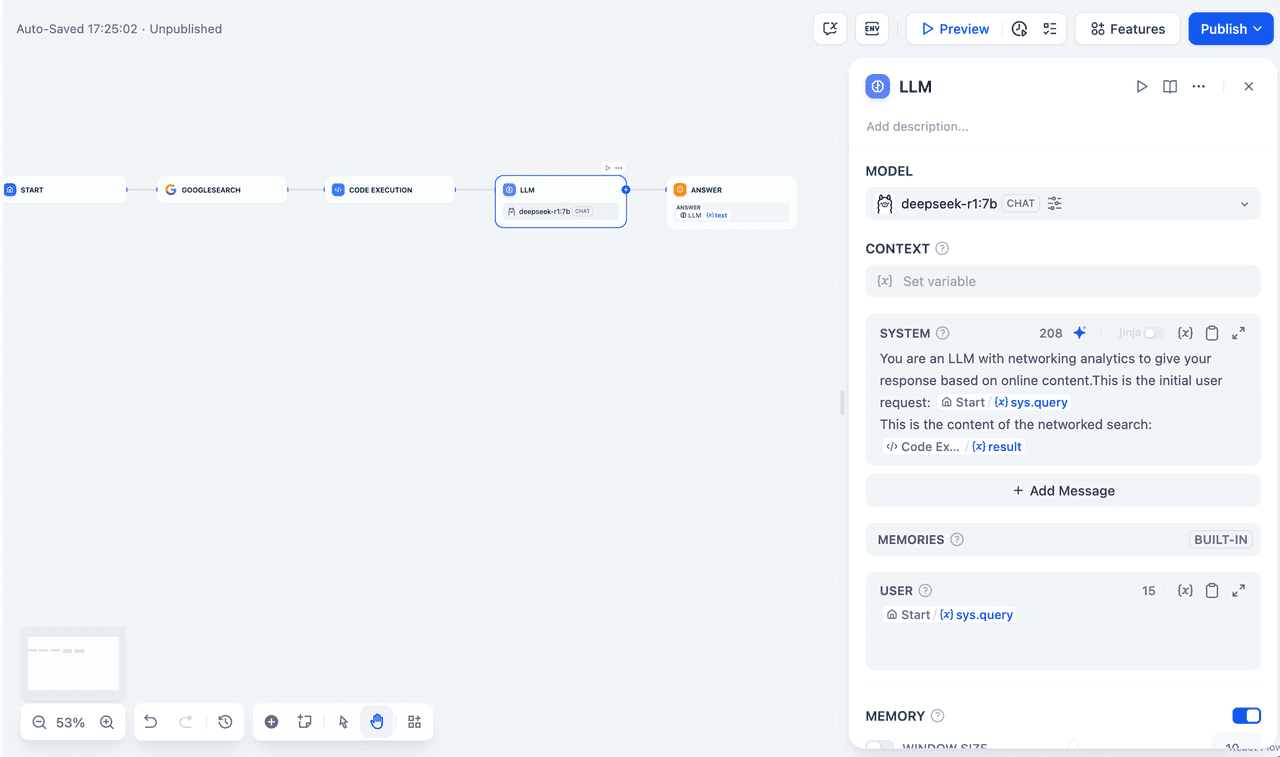
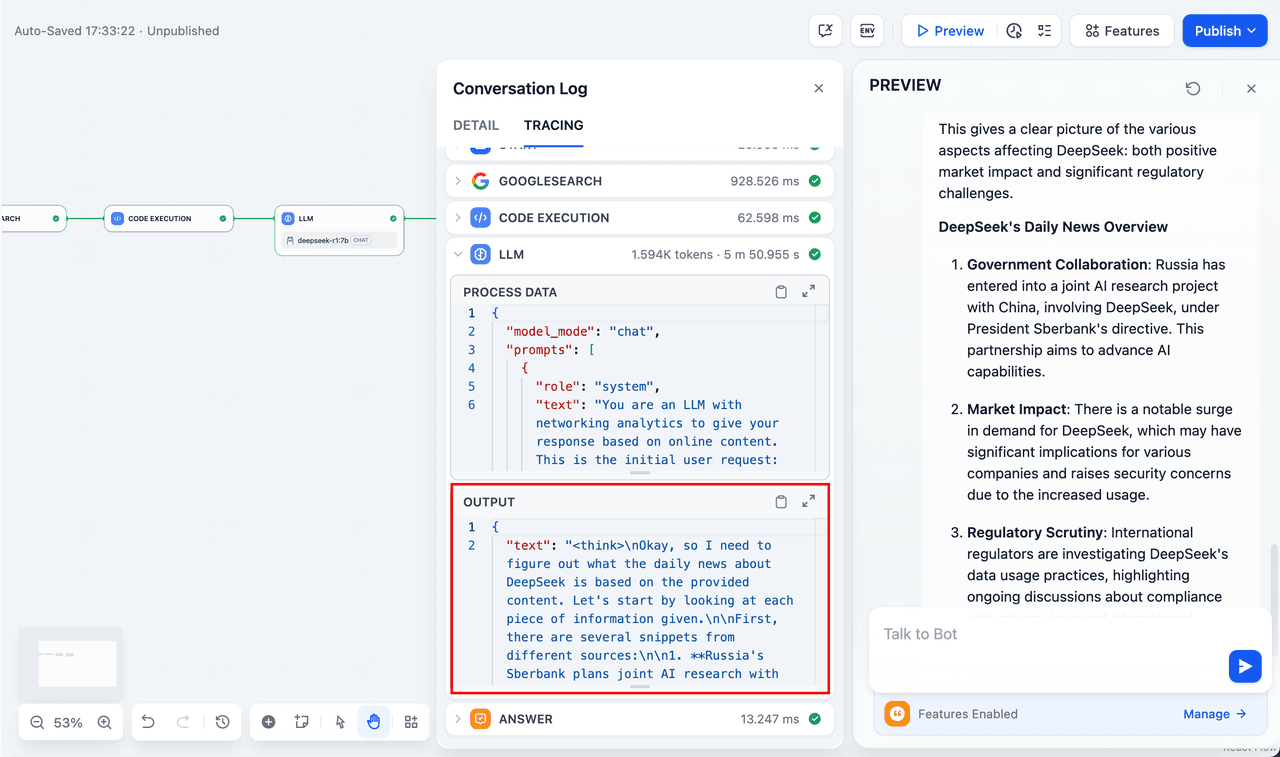
5. Finally, add an End node that references the output from the LLM node. Test your setup in the preview window; if you get a response, your app is ready, and you can inspect the LLM’s reasoning process in the logs.
FAQ
3. Connection Errors When Using Docker
If running Dify and Ollama inside Docker results in the following error:
httpconnectionpool(host=127.0.0.1, port=11434): max retries exceeded with url:/cpi/chat
(Caused by NewConnectionError('<urllib3.connection.HTTPConnection object at 0x7f8562812c20>:
fail to establish a new connection:[Errno 111] Connection refused'))Cause:
Ollama is not accessible inside the Docker container because localhost refers to the container itself.
Solution:
Setting environment variables on Mac:
If Ollama is run as a macOS application, environment variables should be set using launchctl:
- For each environment variable, call
launchctl setenv.
launchctl setenv OLLAMA_HOST "0.0.0.0"- Restart Ollama application.
- If the above steps are ineffective, you can use the following method:
- The issue lies within Docker itself, and to access the Docker host. You should connect to
host.docker.internal. Therefore, replacinglocalhostwithhost.docker.internalin the service will make it work effectively.
http://host.docker.internal:11434Setting environment variables on Linux:
If Ollama is run as a system service, environment variables should be set using systemctl:
- Edit the systemd service by calling
systemctl edit ollama.service. This will open an editor. - For each environment variable, add a line
Environmentunder section[Service]:
[Service]Environment="OLLAMA_HOST=0.0.0.0"- Save and exit.
- Reload
systemdand restart Ollama:
systemctl daemon-reloadsystemctl restart ollamaSetting environment variables on Windows:
On windows, Ollama inherits your user and system environment variables.
- First Quit Ollama by clicking on it in the task bar
- Edit system environment variables from the control panel
- Edit or create New variable(s) for your user account for
OLLAMA_HOST,OLLAMA_MODELS, etc. - Click OK/Apply to save
- Run
ollamafrom a new terminal window How to Modify the Address and Port of Ollama Service?
Ollama binds 127.0.0.1 port 11434 by default. Change the bind address with the OLLAMA_HOST environment variable.
Related articles
- How to
How to Let Your Agent Call Dify Workflows Directly
Learn how to quickly invoke existing Dify apps, turning complex business workflows into a single prompt and one human approval.
 Dify
Dify - How to
How to Add an AI Support Assistant to Your Website with Dify
Step-by-step tutorial on how to build, test, and embed an AI chatbot right into your website.
Dify - How to
How Marketer Builds Reliable AI Workflows
Every marketer can write a prompt. Few have figured out how to scale them. Inside: three workflows marketing teams actually build. Got a repetitive task you wish was a template? You name it. We build it for free.
Dify - How to
Get Started with Dify
In this guide, you'll learn the core fundamentals, find the right starting point for your first AI application, and grab useful resources to hit the ground running.
Dify